
Razer Kishi Ultra Review
Razer's new Kishi Ultra controller raises the bar for all other mobile peripherals, supporting iPad Mini to boot.

We’ve covered Vancouver-based Payfirma back when they first launched their mobile payment solution in the summer of 2011, which included their portable swiper to help businesses accept payments on the go from their iPhone. Just recently Payfirma launched their Tablet POS (Point-of-Sale) iPad app to allow the tablet to turn into a full-scale cash register and inventory management system. We have taken a deeper look at this app to see if it really works as advertised.
Here’s an overview of what this new app can do:
Since the app is a free download, it allows any user to sign up instantly for a free trial to test out the new POS system. We took it for a quick spin and wanted to see just how easy it was to setup, use and manage store inventory from the convenience of an iPad.
Signing up requires users to enter a username, email and password. You will be prompted as to the strength of your password, which does keep users honest in avoiding simple, insecure passwords. Once registered, users will be immediately greeted with their terminal screen where they can add store inventory. A slide-out menu on the left hand side (tap or swipe can bring it to the front) reveals the simple menus available for users: My Transaction, Inventory Management, Receipt Settings, Tipping ON/OFF toggle, Tax Settings, Currency toggle (US/CA) and Printer Settings.
We decided to go deeper and see just how hard or easy it would be to setup our own used iPhone store. Adding new items was very simple and straightforward after tapping the Inventory Management menu. We named our example store ‘Orange’, a classy place to buy used iPhones.
From the ‘Add a New Product’ screen, merchants cab enter in the product name, add a photo, choose a group (optional), toggle tax settings and add variations of these items below. So in our case, we added 4GB and 8GB models of the original 2007 iPhone.

What I found was a nice touch was the app has auto capitalize for product names, saving users from pressing ‘shift’ every single time. I ended up adding models of each generation of the iPhone to round out our store to see how the experience would be to go through a transaction from beginning to end.
After finishing up your inventory, a few more simple steps are required to get the POS going. Under Receipt Settings, the options are fairly simple. You can toggle credit card signatures and also add a customized note to the bottom of all receipts, which can be emailed out to customers or sent to a printer. Tax Settings are also equally as simple. Users just add tax categories by percentage and name, with quick toggles available for various types of taxes available. In our case, being in BC we added 5% GST and 7% PST. As for the Currency setting, it’s either a toggle for US or Canadian dollars.


With everything setup in a matter of minutes, the Terminal view is where the register would normally reside. A subtle drop down animation reveals a search field to find any item by name, subitem description or SKU. Below this search field are inventory items, which can be viewed in a thumbnail grid view or line by line view. There’s also a starred screen for popular products or frequently charged items.
Let’s say we have a buyer for one of our 2007 iPhones. All you do is tap the product, then items appear in a list. Tap the item and it is quickly added to the side column, ready to be charged. Tapping the item in the charge column brings up a simple pop-up to modify quantities or add a discount. It’s all very simple and straightforward, definitely made for ease of use and speed. Most menus have slightly larger fonts and buttons to make it simple for anyone to use the register without first learning complex instructions.

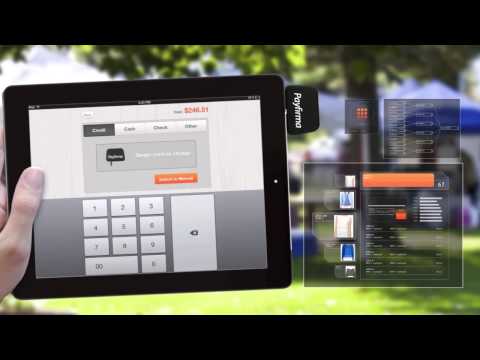
Once an item is charged, the payment processing screen shows options to accept payments via credit, cash, check or other. For credit cards, it’s seamless to enter in details manually or use the Payfirma swiper. But what I found intuitive was the cash screen, which predicts how much cash a customer would pay, allowing staff to quickly process change efficiently. So for an iPhone totalling $1007.99 for example, options of $1008, $1010 and $1020 appeared, allowing for an efficient checkout process as the app quickly calculates the change due on the final screen, prior to allowing receipts to be emailed out or printed. This final screen has a ‘new transaction’ shortcut button placed which takes the user right back to the Terminal view, to start another transaction right away.


Receipts emailed or printed for customers include relevant information on the transaction and also include a thumbnail map view of where the purchase took place, which keeps it easy to track sales or refunds. Speaking of the latter, to process a refund, just navigate to the Transaction History menu, tap the transaction and tap the large red ‘Refund’ button, which will immediately reverse the transaction. Receipts have the option of having logos and links to Facebook, Twitter and Yelp to help leverage your social media channels.


Overall, it is apparent lots of thought went into the Payfirma POS app to turn any iPad into a fast, intuitive and efficient cash register anyone can learn and use in a snap. The app does not come pre-loaded at launch with ‘tutorial screens’ because it’s just not necessary. The app was easy enough for me to setup a quick store, tax and receipt settings and more in 5-10 minutes.
Although easy to use, we did find some areas of the app which could improve. Closing the app and relaunching would require logging in every single time. I can see this being a pain to do every single time you exit the app, but at the same time it brings a layer of security to the app. It would be nice to see a passcode option to unlock the screen instead. Also, the transactions screen ran into errors while trying to process a credit card, specifically being unable to delete credit card numbers without highlighting then tapping delete. Updates surely will address these issues.
Check out the quick video below on how the complete Payfirma POS iPad setup can help your business:
We spoke with Payfirma CEO Michael Gokturk about the new Tablet POS app, and he tells us this particular app is geared towards retailers and quick serve businesses, with other areas such as tourism, trades and pop-up shops seen to be beneficiaries as well. Payfirma, according to Gokturk, has been known to be called the “enterprise version of Square” as it offers more control (i.e. deeper user permissions), broader product (web, terminal, ecom, etc) and full customer support. Essentially, businesses with both an eCommerce store and retail can get value from Payfirma’s consolidated service/platform.
When asked why customers should choose Payfirma over others such as Square, Kudos Payments, PayPal Here, Intuit GoPayment, or PAYD by Moneris in the hotly contested mobile payment market, Goturk explained to us over email:
“Payfirma is the one place to get your full payment products. No need to go to a eCom vendor, payment processor, mobile payment provider, etc. All data is stored in one place which means businesses get better/simpler analytics across all their revenue lines.”
Although numerous industries are touted to benefit from a Payfirma Tablet POS system, the CEO tells us there are still certain businesses that wouldn’t use it yet, such as restaurants and grocery stores with special needs (i.e. kitchen service, weight scales, etc).
The Tablet POS system is currently priced at $45 per month and costs $199 to get it setup. As for transactions with Payfirma, the company charges 1.99% + $0.25 per transaction.
Do your research, find comparables and make a choice for your business. From what we’ve seen with our experience using the Payfirma Tablet POS app, it’s simple to setup inventory, plus processing transactions are intuitive and fairly straightforward, saving you training hours towards staff on how to use older, more complex POS terminals.
Click here to download the Payfirma POS app–it’s free to sign up to use and try out. Sign up for Payfirma here.

