
iPhone Photography Awards 2026 Winners Announced
The IPPA, which has run for 19 years, showcase some of the best photos taken using an iPhone by global photographers.
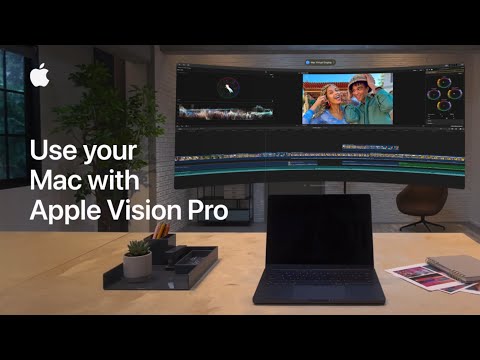
A new Apple support video on YouTube details how you can use Apple Vision Pro as a private, portable 5K display for your Mac with Mac Virtual Display.

To utilize the Mac Virtual Display feature, ensure that your Mac is running macOS 14.0 or later. Both your Mac and Apple Vision Pro should be signed into the same Apple ID with two-factor authentication enabled, have iCloud Keychain active, and be within 10 meters of each other with Bluetooth and Wi-Fi turned on.
Here’s how to connect your Mac to Apple Vision Pro.
For MacBook Users:
For Desktop Mac Users (iMac, Mac mini, Mac Studio):
Once connected, your Mac’s display will appear as a window within the Apple Vision Pro environment. You can reposition this virtual display by pinching and dragging the window bar at the bottom.
You can use your Mac’s built-in keyboard and trackpad, or any connected Bluetooth peripherals, to operate your Mac within the Apple Vision Pro environment.
Check out Apple’s video below to learn more.
Want to see more of our stories on Google?
P.S. Want to keep this site truly independent? Support us by buying us a beer, treating us to a coffee, or shopping through Amazon here. Links in this post are affiliate links, so we earn a tiny commission at no charge to you. Thanks for supporting independent Canadian media!

