How To Unlock Your 8GB Apple iPhone v1.1.1
When I first picked up my 8GB Apple iPhone, the v1.1.1 firmware had just been released by Apple. Turns out the iPhone I picked up from the Apple Store at Alderwood Mall was the newest 1.1.1 firmware–DOH! So that meant the online guides enabled me to “jailbreak” (aka bypass the iTunes activation screen), but until someone had figured out the hack to the phone portion, to enable the iPhone to be used with any GSM carrier (in my case, Fido in Canada), my iPhone was pretty much a paperweight. I was just waiting for a guide that read “how to unlock your 8GB Apple iPhone v1.1.1“…when finally one came out!!
All I could do was wait…the Hackin0sh forums are one of the best resources on the internet for your Apple hacking needs. The idea was simple–downgrade my v1.1.1 iPhone to v1.0.2, then apply the AnySIM unlock, and BAM, I would be good to go! The guide I followed was an early guide, so that meant typing in code and doing all sorts of funky stuff for the unlock. All I can say was I super nervous during the unlock, as I was worried I might screw up somehow and end up BRICKING my $490CDN iPhone! Jeez, the lengths some people go to get their hands on an iPhone, hey??!
I followed the step by step unlocking guide posted by carlosvaldosta from the Hackint0sh forums; This guide took me a while but I know that it worked as I was able to successfully unlock my 8GB Apple iPhone!!
Disclaimer: Use these instructions at YOUR OWN RISK!!! Please read through it carefully before you attempt anything! 🙂
First off, I want to thank the Dev Team for all their hard work, Rebornsoul for helping to answer questions on my other guide while I was down a laptop…Still am actually…Brasuco for PACAY, and Stealth for makeing a easy guide to follow.This will work with both a Virgin 1.1.1, and a bonehead upgrade to 1.1.1Last i want to say that i take no credit for anything. I am here to make it easier for everyone who wants to downgrade and unlock, not to say that any other guide is difficult, but i have a thing for giving good directions!
Now this guide is for those who may not have too much experience with SSH or Putty, however i will make it as easy as possible.
Pre-instructions: Create a new folder on your desktop and name it whatever you want, but put all downloaded files here.
Downloads: You will need everything from my previous Thread here:
http://www.hackint0sh.org/forum/showthread.php?t=6637
(I like using itunes 7.4.1.2, and i would recommend everyone use it as it has givin me no issues so far)
and also http://iphone.exploit.org/pxl/Installer-2.63.pxl
Then you will need this great package from Stealth:
(Bottom of page)
http://www.hackint0sh.org/forum/showthread.php?t=10863
***when you extract the files you will need to rename secpack40113.bin to secpack (no extension…just secpack)Download Open SSH here : http://iphone.exploit.org/pxl/OpenSSH-4.6p1.pxlDownload Putty here: http://the.earth.li/~sgtatham/putty/…/x86/putty.exe
You will also need bbupdater, which i can’t post, but there are 1000 ways to get it.Last you need open normal WiFi access.Same rules follow as last guide: READ EVERY STEP BEFORE DOING IT!
1) Make Sure iphone is off. Open itunes (Ver 7.4.1.2)
2) plug your phone into your PC, and as soon as the gray apple appears, press and hold both power and home buttons. Hold for exactly 10 seconds, then let go of just the power button.(If you look very closely, after about 7 seconds the screen will power down and pixelate, this is the lead in to the hidden restore state.) After about another 15 Seconds of holding down the Home button, itunes will find your iphone and say it needs to restore.
3) Shift – Restore and select the 1.0.2 Firmware. When it completes it will give you “1013” error message, press ok, and do not restore again… Just close itunes.
***From this point on you may have to run apptapp several times, depending on your PC***
4) Open apptapp, select 1.0.2, and press ok. AppTapp should go thru the whole process, and may give you an error. Close AppTapp and open it again. Run AppTapp again on 1.0.2, and it should complete without an error.
***If at this step you do not see the “Waiting for Activation” screen, you will have an extra step. if you do see the activation screen skip below the star.
*)If you have a Yellow Triangle still, you wil need to go into the folder you unzipped ibrickr. There is a icon that says iphoneinterface.exe. Double click, and you will get a prompt you can type from. Type “setenv auto-boot true” then hit enter. Then type “saveenv” then hit enter again. Last type “fsboot” and hit enter again. Close the command window, and after about 5 seconds you will see the Activation screen on your iphone, you may have to turn off and back on.
5) Open Itunes, let it “see” the iphone, close itunes, then Run AppTapp one last time, then Run Paycay to Jailbreak.(if you need detailed instructions for these steps look at my previous guide steps 7 and 8)
6) You should now be unbricked, and jailbroken. Go to Settings -> General -> Auto lock -> set to never. Open iBrickr, and click applications.
Install unlock-fast.pxl, installer.pxl, and OpenSSH-4.6p1.pxl
7) Now go to the files menu on iBrickr, and click on /usr, when it changes directory, click on /bin. You will need to upload the following files to this directory: ICE03.14.08_G.eep, ICE03.14.08_G.fls, bbupdater, secpack, and ieraser
8) Make sure you are connected to WiFi on your PC, and on the iphone. Get your ip address from your iphone(click settings, wifi, select a network, press the little blue arrow to look at details, and you ip address should be here)l
Open Putty, it will have the correct settings already, all you will need to do is enter the ip address that you got from above, and hit Open at the bottom.
9) Putty will open a new terminal window. if you are using a pay wifi access point you may have some issues here, thus the recommendation of a normal wifi connection above. Putty will open and it will ask you for a username, enter “root”
next it will ask you for a password… this can take a few seconds depending on your connection. type “dottie”, and hit enter.(when you type in dottie it will not appear at the prompt… Just type it in and hit enter)(if you do not get a prompt for a password, close putty and relogin. it can take a couple of tries)
10) You are in the root of your iphone. type “launchctl remove com.apple.CommCenter” (capitals ARE required)
11) Now type cd /usr/bin (this will change you to the right directory, on one phone it would not allow me to do this and i had to cd /usr then hit enter, then cd /bin then hit enter again…not sure why)
12) You are now in the folder where all of the files you copied over. Type “chmod 775 ieraser” then hit enter. Next type “chmod 775 bbupdater” then hit enter.
now type “bbupdater -v” it should poll the firmware, and report back after a few seconds.
13) Type “ieraser”. You are now erasing your firmware!(if it hangs while looking for files, you will have to close out putty and start from step 11 again)
14) When ieraser finishes run “bbupdater -v” again and it will fail, this is ok. When it fails type in “bbupdater -e ICE03.14.08_G.eep -f ICE03.14.08_G.fls”, you are now reloading your firmware.
15)When it completes, type in “bbupdater -v” one last time and it will give you your correct firmware version.(a couple of times after the update finished “Putty” would show up on the command line…just delete it and type in the command)
16) Click on iunlock on your springboard, press start. Wait until it finishes, then turn off your iphone. If this is a Virgin iphone, take out the ATT Sim and say “This sim has been freed by The Liberator! AKA CarlosValdosta!!!” <– Very important step!
17) Put your sim in and turn on your Unlocked iphone FW 1.0.2!
18) Go back to applications on ibrickr, remove iunlock.pxl, and the openSSh.pxl…and if you want the installer.pxl.
19) Have Fun!
20) Donate to DevTeam… they deserve it!
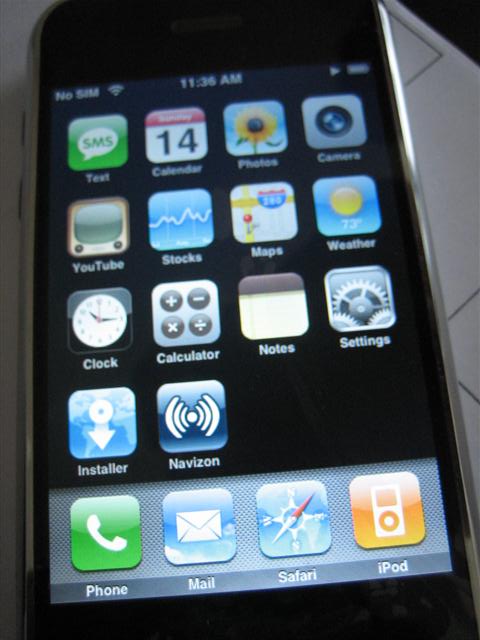
Here she is…after the unlock in all its glory, YouTube working perfectly and everything else too (except for Visual Voicemail as that’s only for AT&T users in the USA. Next up, how to update from an unlocked v1.0.2 to 1.1.1!!!
Technorati Profile


There is no need to downgrade to 1.0.2 to unlock a 1.1.1 OTB iPhone. You can find the tutorial here : http://iphone.unlock.no/
Hi stefokebec! Yeah, I am aware of the new 1.1.1 unlock…these instructions were the ones I followed prior to jailbreakme.com …which is much easier than what I had to do! 🙂
i LoVVVVVVVVVVVVeeeeeeeeee tHHHHHHHHHHHHHHHHHHHHHHHHHHhheEeEeeEEEEee they unlock TTtThHhhHhyheEEeEeeyyYYyy iPHONNNNNNNNNNNNNNNNnnEeeeeeEeEEEEEEeE!!!!!!!!!!!!!!!! When i get mine this month for my B-day it was on the 9 of may i just went 14!!!!!!!!!!!!!!!!!!!!!!
There is no need to downgrade to 1.0.2 to unlock a 1.1.1 OTB iPhone. You can find the tutorial here : http://iphone.unlock.no/
There is no need to downgrade to 1.0.2 to unlock a 1.1.1 OTB iPhone. You can find the tutorial here : http://iphone.unlock.no/
There is no need to downgrade to 1.0.2 to unlock a 1.1.1 OTB iPhone. You can find the tutorial here : http://iphone.unlock.no/
There is no need to downgrade to 1.0.2 to unlock a 1.1.1 OTB iPhone. You can find the tutorial here : http://iphone.unlock.no/
There is no need to downgrade to 1.0.2 to unlock a 1.1.1 OTB iPhone. You can find the tutorial here : http://iphone.unlock.no/
There is no need to downgrade to 1.0.2 to unlock a 1.1.1 OTB iPhone. You can find the tutorial here : http://iphone.unlock.no/
There is no need to downgrade to 1.0.2 to unlock a 1.1.1 OTB iPhone. You can find the tutorial here : http://iphone.unlock.no/
Hi stefokebec! Yeah, I am aware of the new 1.1.1 unlock…these instructions were the ones I followed prior to jailbreakme.com …which is much easier than what I had to do! 🙂
Hi stefokebec! Yeah, I am aware of the new 1.1.1 unlock…these instructions were the ones I followed prior to jailbreakme.com …which is much easier than what I had to do! 🙂
Hi stefokebec! Yeah, I am aware of the new 1.1.1 unlock…these instructions were the ones I followed prior to jailbreakme.com …which is much easier than what I had to do! 🙂
Hi stefokebec! Yeah, I am aware of the new 1.1.1 unlock…these instructions were the ones I followed prior to jailbreakme.com …which is much easier than what I had to do! 🙂
Hi stefokebec! Yeah, I am aware of the new 1.1.1 unlock…these instructions were the ones I followed prior to jailbreakme.com …which is much easier than what I had to do! 🙂
Hi stefokebec! Yeah, I am aware of the new 1.1.1 unlock…these instructions were the ones I followed prior to jailbreakme.com …which is much easier than what I had to do! 🙂
Hi stefokebec! Yeah, I am aware of the new 1.1.1 unlock…these instructions were the ones I followed prior to jailbreakme.com …which is much easier than what I had to do! 🙂
i LoVVVVVVVVVVVVeeeeeeeeee tHHHHHHHHHHHHHHHHHHHHHHHHHHhheEeEeeEEEEee they unlock TTtThHhhHhyheEEeEeeyyYYyy iPHONNNNNNNNNNNNNNNNnnEeeeeeEeEEEEEEeE!!!!!!!!!!!!!!!! When i get mine this month for my B-day it was on the 9 of may i just went 14!!!!!!!!!!!!!!!!!!!!!!
i LoVVVVVVVVVVVVeeeeeeeeee tHHHHHHHHHHHHHHHHHHHHHHHHHHhheEeEeeEEEEee they unlock TTtThHhhHhyheEEeEeeyyYYyy iPHONNNNNNNNNNNNNNNNnnEeeeeeEeEEEEEEeE!!!!!!!!!!!!!!!! When i get mine this month for my B-day it was on the 9 of may i just went 14!!!!!!!!!!!!!!!!!!!!!!
i LoVVVVVVVVVVVVeeeeeeeeee tHHHHHHHHHHHHHHHHHHHHHHHHHHhheEeEeeEEEEee they unlock TTtThHhhHhyheEEeEeeyyYYyy iPHONNNNNNNNNNNNNNNNnnEeeeeeEeEEEEEEeE!!!!!!!!!!!!!!!! When i get mine this month for my B-day it was on the 9 of may i just went 14!!!!!!!!!!!!!!!!!!!!!!
i LoVVVVVVVVVVVVeeeeeeeeee tHHHHHHHHHHHHHHHHHHHHHHHHHHhheEeEeeEEEEee they unlock TTtThHhhHhyheEEeEeeyyYYyy iPHONNNNNNNNNNNNNNNNnnEeeeeeEeEEEEEEeE!!!!!!!!!!!!!!!! When i get mine this month for my B-day it was on the 9 of may i just went 14!!!!!!!!!!!!!!!!!!!!!!
i LoVVVVVVVVVVVVeeeeeeeeee tHHHHHHHHHHHHHHHHHHHHHHHHHHhheEeEeeEEEEee they unlock TTtThHhhHhyheEEeEeeyyYYyy iPHONNNNNNNNNNNNNNNNnnEeeeeeEeEEEEEEeE!!!!!!!!!!!!!!!! When i get mine this month for my B-day it was on the 9 of may i just went 14!!!!!!!!!!!!!!!!!!!!!!
i LoVVVVVVVVVVVVeeeeeeeeee tHHHHHHHHHHHHHHHHHHHHHHHHHHhheEeEeeEEEEee they unlock TTtThHhhHhyheEEeEeeyyYYyy iPHONNNNNNNNNNNNNNNNnnEeeeeeEeEEEEEEeE!!!!!!!!!!!!!!!! When i get mine this month for my B-day it was on the 9 of may i just went 14!!!!!!!!!!!!!!!!!!!!!!
i LoVVVVVVVVVVVVeeeeeeeeee tHHHHHHHHHHHHHHHHHHHHHHHHHHhheEeEeeEEEEee they unlock TTtThHhhHhyheEEeEeeyyYYyy iPHONNNNNNNNNNNNNNNNnnEeeeeeEeEEEEEEeE!!!!!!!!!!!!!!!! When i get mine this month for my B-day it was on the 9 of may i just went 14!!!!!!!!!!!!!!!!!!!!!!