Protect your Wi-Fi Browsing from Firesheep
Disclaimer. This tutorial is definitely for the more advanced users. iphoneincanada.ca is not responsible for any damage to your computer, your network, your iPhone or your sanity, proceed with caution.
What you’ll need
- An SSH server. If you run OS X or Linux you already have this running on your machine
- A web server
- iSSH for your iPhone or iPod Touch
- An iPhone/iPod Touch that supports “multitasking” so an iPhone 3GS or 4G with at least iOSÂ 4
- A little bit of patience there are quite a few steps
Recently a FireFox plug-in called Firesheep has been released that allows people to steal your login cookies for websites like Facebook and twitter. There have been several ways published to protect yourself on a desktop/laptop Computer but so far I haven’t read about any way to protect yourself on an iPhone unless you have a VPN server somewhere. What we’re going to do is use a couple off the shelf pieces of software to create a secure tunnel from your iPhone to a safer network (your home network)
This first thing you’re going to need is an SSH server. If you’re using OS X or Linux this is built in for Windows there are several OpenSSH servers available ( such as http://sshwindows.sourceforge.net/ )
I won’t be going into how to install or setup the SSH server as there are many other tutorials dedicated to this. Just search Google
The first thing we’re going to do on our SSH server is create a dynamic forwarding that will act as a socks proxy server.
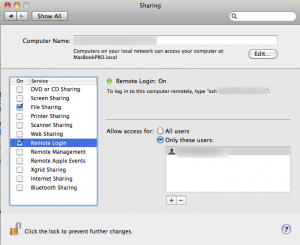
if you’re on OS X you need to first ensure that “Remote Login” is turned on from within the “Sharing” section of your “System Preferences”
As well make sure a port is opened up to your SSH server in your firewall (Port 22 by default)
We next need to open up a Terminal window (You should find “Terminal” in the Utilities folder in your “Applications” folder in OS X, in Windows you should have a terminal program installed with your OpenSSH server if not you may need to use something like Putty to actually connect to your SSH server )
In the terminal window type the following
ssh 127.0.0.1 -D x.x.x.x:9999
replace x.x.x.x with the IP address of your computer, in my case this was 192.168.1.50
This creates our SOCKS Proxy
the next thing we need to do is create a .pac file and upload it to your webspace
The .pac file is just a plain text file with the following in it.
function FindProxyForURL(url, host) {
return “SOCKS 127.0.0.1:8881”;
}
put the file on your website so it’s accessible from the internet with an address like “www.website.com/thisismypacfile.pac”
we’re almost set, time to move over to the iPhone
start up iSSH now
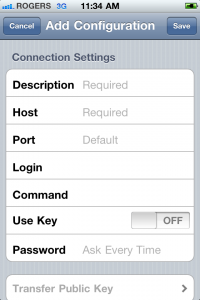
you need to go in and create a configuration for your ssh server
you’ll have to give it a Description
the “Host” is the IP address or hostname you can reach your SSH server at from the Internet.
“Port” would be the port you opened in your firewall for your SSH server (the default is 22)
Your “Login” for your ssh server and “password” if desired (if you don’t fill in your password you will be asked for it each time you login)
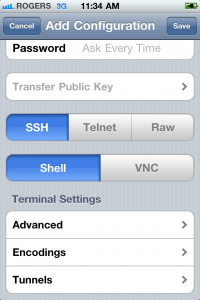
scroll down to the bottom and tap the “Tunnels” button
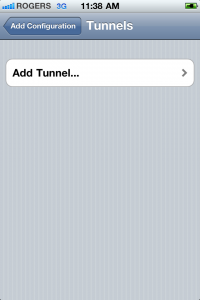
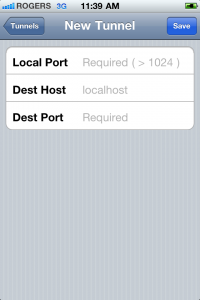
tap “Add Tunnel..” for the local port we’ll select 8881 (notice it matches the port in your pac file) for Dest host we want to type the IP address from the “ssh 127.0.0.1 -D x.x.x.x:9999” command we typed earlier and then the Dest port will be the 9999 from that same command.
once that’s all entered in tap “save” and navigate back to the “Edit Configuration” screen of iSSH and tap “save” button there. Then navigate back to the Main screen in iSSH.
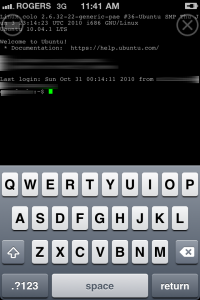
Tap on the connection you’ve just setup and once you’re connected press your home button to switch back to your home screen.
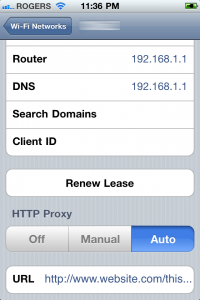
Now open up “Settings” then tap “Wi-Fi” turn Wi-Fi on if it isn’t already. Select the Wi-Fi network you want to connect to then press the blue arrow button to the right of it. Scroll down to the bottom of the screen and change HTTP Proxy to “Auto” a “URL” bar will appear tap on it and type in the address of your pac file you created and put online earlier (eg http://www.website.com/thisismypacfile.pac ).
Exit back to the home screen and fire up Safari if all the previous steps were done correctly then you should now be browsing over a secure SSH tunnel try going to a site like http://whatismyip.com and it should show you the IP address of your SSH server.
