It’s been a good week for Canadians, as Apple Pay finally expanded beyond its American Express debut last fall, with RBC and CIBC launching support on Tuesday for their debit and Visa/MasterCards. Meanwhile, TD, Scotiabank and BMO are set to launch support next month, while Tangerine in 6-8 weeks.
If you have Apple Pay setup on your iPhone and Apple Watch, here are some tips to make your checkout experience even faster. These may not be new to experienced Apple Pay users, but they are worth sharing with all the newbies out there.
1. Setup your Default Card
The first card you add to Apple Pay will be default. If you have more than one card, checking out means you need to switch cards at the till, which takes time. Below are steps on how to change your default card on iPhone and Apple Watch.
iPhone: Settings > Wallet & Apple Pay; scroll down to Default Card, select the card you want.
Apple Watch: Open the Watch app on iPhone, then go to My Watch > Wallet & Apple Pay, go to Default Card then pick one.
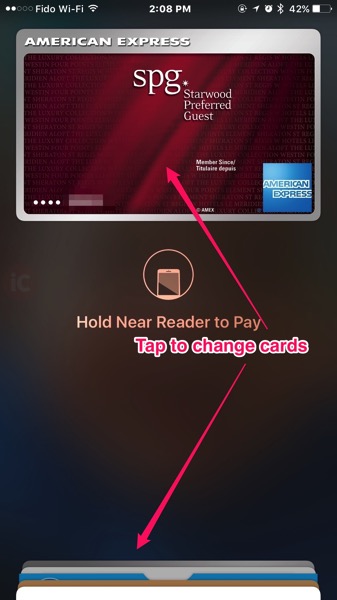
You can also switch cards quickly by double-tapping the Home button from the lockscreen, then tapping on your cards:

2. Add Extra Thumb Fingerprints to Touch ID
Apple Pay is authenticated with Touch ID, so when you bring your phone to the retailer’s terminal, your thumb may be in a different position or weird angle, which may not authenticate every single time.
iPhone 6s users typically will have no issue with this, since the second generation of Touch ID is so fast and accurate you can’t even check the time on the lockscreen usually. But for those with an iPhone 6 and original Touch ID sensors, you can minimize chances of Touch ID not working properly at checkout by adding extra fingerprint profiles for your thumbs.
Go to Settings > Touch ID & Passcode > Add a Fingerprint, then add extra profiles for your left and right thumbs. You can tap profiles to name them, or place your fingerprint down and the profile should ‘light up’ to indicate which one of your digits it is assigned to.

3. Never Mention You are Paying with Apple Pay at Checkout
Since Apple Pay is still in its infancy, if you’re out testing it for the first time, do not say you are paying with Apple Pay at checkout. It will confuse cashiers if their store is unaware of smartphone NFC payments.
Just say you’re paying with “credit card” or “Visa” or “MasterCard” or “Amex” or “credit card” or “debit”—you may even have to pretend you’re reaching for your wallet. If you do mention Apple Pay, you may encounter resistant employees who will doubt you, until you prove them wrong (that is if Apple Pay works successfully; otherwise you look like a weirdo).
4. Resist the “Premature” Tap
Do not move your iPhone to the store’s terminal until the screen shows the “tap” or contactless logo. Moving your iPhone too early will not engage Apple Pay, resulting in the huge line up behind you turning into an angry mob. Hover your phone close to reader’s display, not the PIN pad.
Check out ATB’s Apple Pay demo below:
Also make sure you actually have added cards to Wallet on your iPhone for Apple Pay if you’re an RBC customer. Just because you have RBC Wallet does not mean the cards have been added to Apple Pay.
5. Pre-authenticate Touch ID for Apple Pay
This is probably the best tip, shared by savvy iPhone in Canada readers. To launch Apple Pay, you don’t have to load the Wallet app and then select your card. The moment you move your iPhone near the terminal, Apple Pay will automatically light up your display and your default card will show. If your thumb is on Touch ID, it will authenticate immediately.
BUT…if you’re in a line up, you can pre-authenticate Apple Pay too. Just double tap the Home button, and authenticate Touch ID:

The message will soon change to “Hold Near Reader to Pay” like normal. At this point, you can RELEASE your thumb from Touch ID and Apple Pay will remain authenticated and stay lit up on the lockscreen (screen timeout is based on your display settings). Once you’re at checkout, just tap your iPhone like you would your credit card for tap and pay.
6. Deciding on Apple Pay with iPhone or Apple Watch
If you have both an iPhone and Apple Watch (you fanboy!), sometimes you may want to try the smartwatch for Apple Pay, but you need to consider the terminal position and whether there is a privacy shield, which can make it difficult to turn your wrist for a solid NFC connection (unless you’re Gumby). If you don’t think you can get your Apple Watch close enough, slum it and take out your iPhone to use Apple Pay.
Hopefully these pro tips will help you become an Apple Pay aficionado. You can also read more about Apple Pay in Canada by checking out our FAQ here. Got more tips? Share them in the comments below!


Great post Gary…thanks. Now I’m ready to go even deeper into credit card hell!
Thanks Harold! How’s Apple Pay so far?
Addictive 🙂
Yeah, it’s awesome. That ‘chime’ is an audible reward, every single time. Pretty sure Apple spent 12 months on perfecting that sound.
Now if only TD would hurry up…Amex and Apple Pay works but of course is not as widespread as tap for Visa/MC #firstworldproblems #bringonjune
Helpful tips. When I see a vendor accepts tapping, I’ll wait till the right moment to say “Visa” and I pay with my watch like its no big deal, like its the most normal thing in the world. Most times the cashier doesn’t even notice. This works well!
A few days ago the cashier at the Shell station was dumbfounded after I paid with my watch (which was underneath my jacket): as I was leaving she turned to her colleague and said “he paid with his sleeve!”… I didn’t bother explaining.
Lol Apple Pay inception
LMAO… Awesome
Yup, exactly what I’ve been doing all along, which makes sense because technically you are still paying with VISA/MC/AMEX/etc. If you say something like “Apple Pay” they’ll get confused as they don’t have a button for that. More often than note I don’t even say VISA, as the question is just “credit or debit?” — which is oddly still an important question even in this day and age, despite the fact that you’d think the terminal would be able to figure that out for itself.
Some cashiers used to kind of look surprised and go “wow” and ask about it back when I first started using it a year ago, but I do find most are just accepting it without much comment — it’s clearly become much more prevalent in the past year.
So far loving every transaction. All the cashiers seem mystified when I pay with either the watch or phone.
Slightly off topic. I’m with Scotia and tangerine so I’m still waiting for Apple Pay. But I love holding my watch up to the drive thru window at Starbucks to pay with the starbucks barcode in the wallet. Only to see them reach their hand underneath mine thinking I’m I’m about to give them change.
Haha…or to block the sun sometimes. that’s funny
my wife and I’s joint info is via Scotia cant wait then that is 3 less cards in my wallet, well when tap is everywhere i guess.
Can’t wait for TD to support.
Ditto
Great post, only place I’ve had an issue with using Apple Pay this past week was at a Safeway Starbucks. I’ve was lucky enough to use Apple Pay with Amex when it was released in Canada. But I find using my debit card using Apple Pay more satisfying, no need to worry about transferring funds/making a credit card payment to Amex, no pin punching, no inserting chip into debit reader.
All my purchases this week have been with Apple Pay except for that one at Safeway, I don’t think they have contactless debit payments turned on. I will try at a self checkout this weekend at Safeway.
Ever since Safeway was bought by Sobey’s I noticed none of their payment terminals will take tap to pay cards anymore [at least in my area of Alberta] when they had just started using it just before the buyout. It’s like Sobey’s insists on going backwards with tech.
our Sobey’s in Calgary supports Tap…odd others dont…
What about about all the credit card Cashback/rewards you miss out on by using your debit instead? I try and and use a credit card for every single purchase. Rewards/Cashback add up quick ????
reward cards still collect points like normal via Apple Pay. at least that what CIBC told me on screen when i added my debit and credit cards (dividend visa)
I know I’ve been using it for months, I was replying to the guy who uses debit instead of credit. No Cashback with debit.
http://www.scotiabank.com/ca/en/0,,48,00.html Scotia offers a cash back Debit. At a rate of 1% and monthly $14.95 fee, you would have to spend at least $1500 a month just to make up your monthly fee.
That’s terrible lol credit it is ????
I actually was in a line up when a customer asked to pay with Apple Pay. Cashier was like “what’s that?” Had to wait 3 minutes after a lengthily conversation between the two.
Lol I just always say credit. If they want to talk about it after they see me pay with my phone then I’ll tell them about it. If there’s no line of course.
Yup. When I first got Apple Pay setup with my U.S. card last year, I made the mistake of saying “debit” in a Tim Hortons’ without even thinking (since my card was a VISA Debit card), and of course it didn’t go through, so I had to correct myself and tell him to push the “credit” button the next time around.
It still perplexes me that the terminals still can’t figure that part out by themselves.
I know, you’d think the machine could tell on its own. ?????
I think they cant due to POS systems the merchants use…for book keeping they flag all credit and debit purchases. it helps them cash out at days end.
True, but there’s no reason the POS system can’t figure that out as well. It knows the difference between VISA, MasterCard, and AMEX automatically, which also have to be reconciled differently for bookkeeping purposes in many businesses. The back-end systems I’ve worked with break all of those down automatically.
At the end of the day, I suspect it’s more of a technical limitation that nobody has ever really bothered to address. Keep in mind that Interac cards have traditionally worked differently from credit cards as well — PINs only came to credit cards a few years ago, while we’ve been using them with Interac since the nineties. I also know that at one point the encryption used for the Interac network differed from that used for the credit card processors, so it’s possible the terminal has to be set for a different protocol for security reasons.
That said, there’s no technical reason I’m aware of that the terminal shouldn’t be able to make that distinction, but for whatever reason building that logic into the terminals has never been a priority.
Either that or there are some that can make the distinction now, but everybody has been trained over the years to ask the question. Come to think of it, the terminals at Loblaws and No Frills might do that — I don’t think he cashiers have been asking that question lately, and it comes up with tap with all payment methods displayed on the screen. Hmm….
First interac debit purchase with my iPhone was to buy Uncharted 4 at EB Games… Cashier was like wtf? Is that an app or something? His mind was blown that it worked.. He was also confused because the bill looked different haha… I then told him its Apple Pay and he was like ohhhh… He was an android fan boy lol…
That is sweet…did you ask him about Android and Samsung Pay?? 😉
omg.. I wish I did, but I could tell he was jelly lol.
One other gotcha that’s worth noting in this whole process… If you’re returning an item you paid for using a credit card via Apple Pay and they ask you to present your card, not only can you use Apple Pay again for the refund, but you’ll most likely actually have to, otherwise the card number won’t match and the refund won’t go through. If you look at your receipt, you’ll notice that Apple Pay uses a virtual card number that differs from your actual credit card, and in most cases refunds have to be returned to the same credit card used to make the original purchase.
This also creates an additional catch for users who have both an Apple Watch and an iPhone, as each device gets its own, unique virtual card number. If you bought something with your Apple Watch, you’ll have to return it using your Apple Watch, for instance. Most stores can work around this if you’re stuck, but usually that’s much more hassle as they’ll have to get a manager to come and override the POS system to authorize the refund in some other way.
Personally, I’ve always felt if the store’s system has a record of the credit card you used in the first place, they shouldn’t really need you to present it for a refund, but the vast majority of them do — the only exception I’ve encountered recently is Lowe’s, which was a refreshing surprise.
I bought a heater for my basement with Apple Pay via iPhone 6 Plus at Canadian Tire. total came to $94.16. it was my first apple Pay purchase. turns out broken heater already at home was a simple $13 fix, so took it back to Canuck Tire. and Apple pay for refund. worked totally fine both times and on purchase i did say Apple Pay and cashier was confused so said credit and worked easily….on refund it was already defaulted to using the credit card i paid with so just tapped my phone and the return clerk was that cool how’d you do that? just said Apple Pay…..used it a lot since and almost ever cashier is amazed. cant wait for more tap enabled terminals since a lots around still dont support NFC payments…then i can completely leave my cards at home
Yeah, I’ve done refunds a few times, but ran into a problem at a Shoppers Drug Mart one time when I presented my iPhone for the refund but had actually paid with my Apple Watch. The system rejected it as being the “wrong card” and the cashier was generally confused as to what was going on — fortunately she didn’t say anything like “Your phone won’t work, you need to use your actual card.” Once I presented my Apple Watch to the terminal, it went through fine.
I generally don’t completely leave my cards at home normally anyway, since if I’m out and about I usually need my wallet for other things, and if I’m carrying my wallet, I might as well carry my other cards — or at least a few of the main ones. That said, when I go out for walks or just wandering around the neighbourhood, I do frequently leave both my wallet and keys (my house is HomeKit enabled) at home, since I know that Apple Pay will be more than adequate if I’m simply stopping into a coffee shop or local store.
yeah thinking my minimalist RFID blocking wallet is going to get just a bit smaller now..for day to day I only need joint debit card (scotia bank) and my Drivers license and RFID card for work. only will physically need my CIBC debit/Visa when planning for nights out/shopping when i know the bill is going to be over $100..still loving it wish transaction limit was higher though like maybe $200 or $250
Yeah, the limit will be a factor, and may take some getting used to for me. My U.S. card that I’ve been using with Apple Pay has no limit (other than the limit on the card itself, or course), so I’ve been able to use that one for transactions in excess of a thousand dollars. Of course, I also don’t always want to be using that one, depending on the exchange rate ????
I tend to carry minimal cards anyway, though. For a while I used a Book Book case for my iPhone, and all of the cards I really needed fit in there just fine. I only stopped using the case as I preferred a more traditional case that kept the screen more accessible.
I do look forward to the day when a wallet will be a thing of the past, but until the banks add contactless to ATMs and the government starts accepting digital drivers licenses (and related documents), it’s a ways away.
hoping Capital One Canada (Costco) joins the fray for apple pay but i doubt it since it also contains our photo and acts as the membership card. trying to use apple pay at tap to pay Gas pumps too so far no luck
Which gas pumps? I’ve had success in the past with Apple Pay at pumps, although I haven’t used it as Costco yet as they only take MasterCard and I haven’t needed to fill up since Apple Pay came to Canada (my U.S. Apple Pay card that I used prior to that was VISA).
I imagine Capital One will be on board sooner or later, so the Costco version might still come on simply for use as a MasterCard, but you’re right that you’ll probably still need the physical card with you at Costco, thus somewhat defeating the purpose. Apple Pay works fine at Costco with other MasterCards, however.
Real Canadian Superstore gas pump only one I have tried so far
Yeah, I’ve had success at the more traditional gas pumps, like Shell, Esso and PetroCan. Can’t remember where it worked specifically, as I usually buy gas at Costco, though.
I have now tried Costco, Super Store and Petro using Debit via Apple Pay…and a local Coke Machine that accept Tap to pay. I think I know why…It seems anything you tap before there is an actual charge wont work..if at pump and set to fill or no exact amount it wont work (CIBC anyways) there needs to be an exact charge the authoring machine needs to be trying to charge to auth Tap to Pay, thats my theory.
For most merchants in Canada the NFC or tap and pay is limited to $100 purchases. So i doubt Costco Capital One will go with Apple pay. Most patrons of Costco have orders of over $100.
While that’s a valid point, but I don’t think it’s the real motivation behind Costco Capital One and Apple Pay. More likely it’s a financial question regarding transaction fees and setting up the infrastructure.
Also, it’s worth noting that the tap-to-pay limit is actually $200 at Costco, although I’ve heard anecdotal reports that some people have been able to do transactions higher than that so it may vary with different cards — having a higher tap limit is certainly something that Costco and Capital One MasterCard could work out if that was the key issue.
I totally agree. but I wonder why with Apple Pay so much more secure than typical Tap to Pay the banks not auth more than $100? is it because they cant without unlocking their debit and credit card to the same amount
The problem as I understand it is that the terminals can’t tell the difference between an Apple Pay (authenticated) transaction and a simple plastic NFC card, so they have no way of knowing they should apply a different limit.
The U.K. ran into the same problem when Apple Pay was launched there last summer, and the answer there was that merchant terminals had to be replaced with ones that support something called the Consumer Device Cardholder Verification Method (CDCVM). I imagine something similar would be required here.
The reason Apple Pay doesn’t have a limit in the U.S. is that they don’t really have tap-to-pay cards down there in the first place, so since Apple Pay is the only available method for contactless payment, they know it’s secure. Similarly, U.S. cards in Apple Pay will work up here with no limits — although of course you’ll be paying in USD.